(Previous Topic: Coupons Tab Options)
Tax Table Tabs
Since the set-up operation of both the Primary Tax is the same as with the Secondary Tax, the description below should apply to both except when otherwise specified. As with previous tabs in the Set-Up forms, the accounts that may be assigned to each tax type could be the same or different.
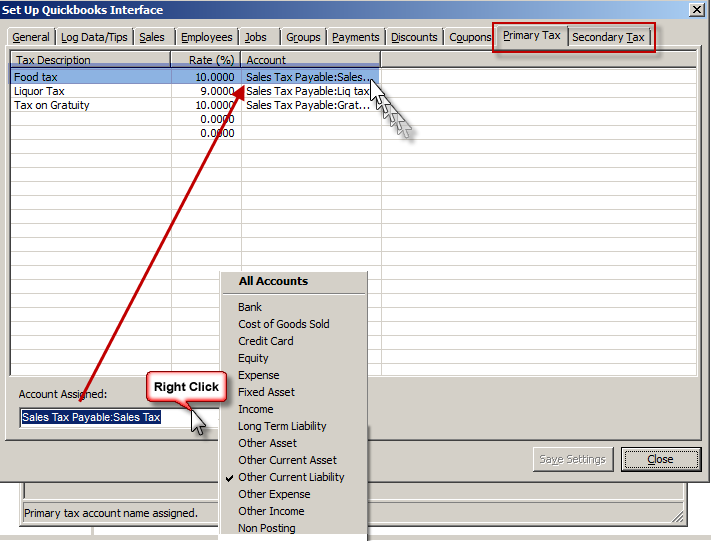
The information displayed on the list can be sorted by clicking on a column header. Example clicking on the Tax Description column heading will alphabetize the list from A to Z. Clicking on the list a second time will sort the information from Z to A. The basic premise to configuring discounts is to select a specific tax row listed under the Tax Description column, select an account in QuickBooks to map tax type to (Account Assigned function), and save your changes. See the section on Setting Up Taxes for detailed information.
The Tax Grid has four columns:
Tax Descriptions- Lists the discounts found in both Restaurant Manager (Tax Table Setup Form).
Code- Lists the corresponding tax type number in the Tax Table Setup Form in the RM BackOffice Module (DISC_NO in Discount.dbf).
Rate %- Lists the corresponding discount percentage in the Tax Table Setup Form in the RM BackOffice Module.
Account- This column displays the QuickBooks accounts the discount has been mapped to (using the Account Assigned option (below).
The other two settings under the Discounts Tab are:
Account Assigned: this function utilizes a drop down menu that contains a list of all QuickBooks accounts that can be used to assign tax types to. The Account Assigned function by default displays all account available in QuickBooks. However, this function can be configured to display certain account types by right clicking on the field and choosing a specific account type (i.e. expense). This is convenient when assigning multiple tax types at once (typically during initial installation).
Save Settings- Use this function to save changes and update QuickBooks
(Next Topic: Configuring Data in POSQBi & QuickBooks)
